Showing posts with label Dutch Oven. Show all posts

Saturday, September 20, 2025

Loaded, Baked Potato Soup


Ingredients

  • 2 lb (uncooked) bacon cut into small pieces
  • 3 Tablespoons butter unsalted
  • 2 medium yellow onion chopped (about 1.5 cup/200g)
  • 7 large garlic cloves minced
  • ⅓ cup all-purpose flour (42g)
  • 3 1/3 lbs gold potatoes 
  • 4 cups chicken broth (945ml)
  • 2 cups milk (475ml)
  • ⅔ cup heavy cream (155ml)
  • 1 teaspoon salt
  • 1 teaspoon ground pepper
  • ¼ - ½ teaspoon ancho chili powder
  • ⅔ cup sour cream (160g)
  • Shredded cheddar cheese, chives, and additional sour cream and bacon for topping 

Instructions

  • Place bacon pieces in a large Dutch Oven or soup pot over medium heat and cook until bacon is crisp and browned.
  • Remove bacon pieces and set aside, leaving the fat in the pot.
  • Add butter and chopped onion and cook over low heat until onions are tender and browned slightly.
  • Add garlic and cook until fragrant (about 30 seconds).
  • Sprinkle the flour over the ingredients in the pot and stir until smooth (use whisk if needed).
  • Add chopped potatoes to the pot along with chicken broth, milk, heavy cream, salt, pepper, and ancho chili powder. Stir well.
  • Cook low until potatoes are tender when pierced with a fork.
  • Add sour cream and reserved bacon pieces, stir well.
  • Allow soup to cook for 15 for minutes before serving.
  • Top with additional sour cream, bacon, cheddar cheese, or chives. Enjoy!

Wednesday, February 10, 2021

Artisan Bread 🍞

 First things first.

It’s important that you know that when you deal with bread you need to use grams or oz measurements. Not cups. This is because when making bread someone can have a heavy hand when measuring. Such as someone can sift their flour and others just put the cup in and take it out and some put the cup in and level the top. You will get different amounts with all 3. A good recipe will give you the grams and/or ounces. So invest in a scale for your baking. 

Second, when you make bread you will need to consider what kind you like. Meaning, knead or no knead. I will always do kneaded bread. In my opinion the kneaded bread is superior to the no knead bread. But if you are new to bread making. Go ahead and start with the no knead. It will take longer and may not rise as well as the kneaded bread but it will be far better that the bread you get from the super market. Give it a try, Your family and friends will be sooooo impressed. 

This recipe is a plain white loaf. Crusty outside with a soft airy inside. Exactly what you want.

Ingredients

Bread Flour 567 grams (100%)

Salt 11 grams (2%)

Instant Yeast 3.5 grams (0.65%)

Water (room temperature) 13.5 oz (68%)

(If you want to make a bigger batch or smaller batch use the bakers’ percentages.)

Directions


It’s good practice to have all your ingredients out before hand. If you don’t you may realize you have ran out of something and don’t have it, or you may not have enough. Plus everything is where you need it, when you need it. 

 Start by putting everything in the mixer bowl, flour first then the rest. I use my Kitchen Aid stand mixer. You can use a bow and your hands or a wooden spoon if you like. If you are using a mixer, use the dough hook.

Set the speed to low and let it run for a moment to start combining everything, then set it to medium speed and let it go another minute or two until combined. It will be a sticky dough when it is done. 
Take it out on to a floured counter. Put some flour on your hands to get it out. 

In this video I will show you how to knead a bread. (This video shows me kneading whole wheat, but the stretch and fold is the same. I do find that the white bread has a lot more stretch as is more sticky.)


After you have kneaded the bread you will have put it in the oiled bowl, covered and let it rest for about 60 min. It should double in size at this point.

Turn it upside down on a piece of parchment paper. Let it fall on its own.


Put some melted butter on top
Using a pastry brush gently brush it to cover the surface.


Make cuts into the dough so it can expand. You can do it however you like. Some do a couple parallel next to each other, some make an X, some make a tic tax toe like I have here. You can be creative here. 


BON APPETIT!!!


Sunday, January 10, 2021

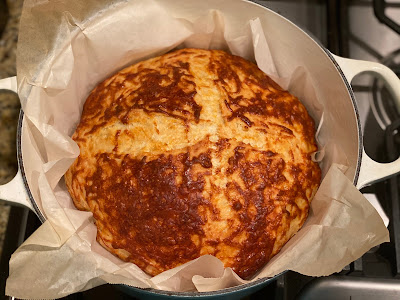
Cheesy Dutch Oven Bread

 This is a favorite of mine. My family and friends love it and my best friend always asks if I have any made when she comes over. Lol. It is a go to and can be used with many things!


Ingredients

8 servings

3½ cups bread flour (445 g), plus more for dusting
2 ½ cups shredded sharp cheddar cheese (250 g), divided
1 tablespoon kosher salt
2 cups warm water (480 mL)
1 package of instant yeast (2 1/4tsp)
(if active yeast, just use warmer water and let it sit 15-20 min longer)
1 tablespoon olive oil

Preparation

Combine the bread flour, 2 cups (200 g) of cheddar and salt. Stir well.

In a separate large bowl, combine the water and yeast. Pour the flour mixture on top of the water and use a silicone spatula to stir until the dough comes together.

 With the spatula, fold the dough around the edges of the bowl toward the middle, rotating the bowl whenever and folding a complete of 8 times. Cover with a kitchen towel and let rest in a warm place for hour, or until almost doubled in size.

 Using the spatula, fold the dough toward the middle again 8 more times. Cover with the towel and let rest for half-hour.

Add the Dutch oven and lid to the oven, with water in it, and preheat to 450˚F (230˚C) for half-hour.

 Lightly flour a clean surface and your hands. Carefully peel the dough out of the bowl and onto the floured surface. Fold the sides of the dough towards the middle 8 times, then flip the dough and transfer to parchment paper.

 Brush the dough with the vegetable oil. Sprinkle the remaining ½ cup (50 g) of cheese on top. Slit the bread for steam

Carefully remove the Dutch oven from the oven, dump the water and use the parchment and lift the bread into the pot. Cover with the lid and bake for half-hour, then remove the lid and bake for 20 more minutes, until the bread is golden brown.

 Pull the parchment out with the bread out of the pot and onto a wire rack. Remove the parchment paper and let the bread cool for a minimum of 1 hour before slicing.
 Slice the bread and enjoy


Great used with Grilled Cheese

Bon Appetit
;