Friday, March 27, 2026

How to Make a Charcuterie Board

    The word “charcuterie” (shaar·koo·ter·eemeans cold cooked meat. That’s French, but of course here in the states we’ve taken the idea of “laying out food on a board to look pretty” and run with it. Technically, there must be meat on the board for it to be “charcuterie.”


    Everyone loves them. Charcuterie boards make you feel So Cultured and Fancy. But really they are just glorified Lunchables. They make stunning centerpieces, and are often the star of the show. Which cheeses should I pick? Should I only pick 4?? And there are rules about hard, soft, stinky, mellow? They're colorful, overflowing, and filled things people love to eat, namely cheese, meat, and bread.

Rules for an amazing charcuterie board


  1. You need a variety of types of cheese: at least 1 soft, 1 hard, 1 tangy. (2 oz per person) “Something old, something new, something goat and something blue.” 
  2. Decide whether the board is gonna be full(no board showing) or minimal.
  3. Don't buy anything you think your guests will eat.
  4. A choice of fun and interesting jams, sauces, and savory spreads absolutely MAKE a charcuterie board. Don’t skimp in this area.
  5. Provide a few different types of crackers and bread. 
  6. Choose a variety of ingredients based on texture: crispy, soft, chewy.
  7. Have something spicy and something sweet
  8. Serve cheese room temperature; it’s more flavorful than cold cheese.
  9. Be strategic in your placement, and arrange the crackers or bread in neat piles or rows, making sure they are not touching anything that will make them soggy.
  10. Make everything bite sized. Cut everything that is going on the board.
    Cheese, meets, fresh fruit, veggies, crackers, nuts, spreads, sauces!

Example


Everyone loves cheese 8 oz. block cheddar cheese, cubed
Hard cheese ("something old") 6 oz. aged Guyère
Soft cheese ("something new") 6 oz. mozzarella balls
Goat cheese 6 oz. chèvre
Blue cheese 6 oz. Cambazola
6 oz. 

thinly sliced s

oppressata

6 oz. 

summer sausage, sliced

6 oz. ham

1/4 cup 

honey

1/2 cup Roasted red pepper hummus

1/2 cup fig jam

1/4 cup dijon

1/2 cup 

smoked almonds

Fresh fruit such as strawberries, blackberries, grapes, and apple slices

1/4 cup 

dried fruit, such as apricots or Craisins

Bread and crackers, for serving 


Saturday, September 20, 2025

Loaded, Baked Potato Soup


Ingredients

  • 2 lb (uncooked) bacon cut into small pieces
  • 3 Tablespoons butter unsalted
  • medium yellow onion chopped (about 1.5 cup/200g)
  • large garlic cloves minced
  •  cup all-purpose flour (42g)
  • 3 1/3 lbs gold potatoes 
  • 4 cups chicken broth (945ml)
  • 2 cups milk (475ml)
  •  cup heavy cream (155ml)
  • 1 teaspoon salt
  • 1 teaspoon ground pepper
  • ¼ - ½ teaspoon ancho chili powder
  •  cup sour cream (160g)
  • Shredded cheddar cheese, chives, and additional sour cream and bacon for topping 

Instructions

  • Place bacon pieces in a large Dutch Oven or soup pot over medium heat and cook until bacon is crisp and browned.
  • Remove bacon pieces and set aside, leaving the fat in the pot.
  • Add butter and chopped onion and cook over low heat until onions are tender and browned slightly.
  • Add garlic and cook until fragrant (about 30 seconds).
  • Sprinkle the flour over the ingredients in the pot and stir until smooth (use whisk if needed).
  • Add chopped potatoes to the pot along with chicken broth, milk, heavy cream, salt, pepper, and ancho chili powder. Stir well.
  • Cook low until potatoes are tender when pierced with a fork.
  • Add sour cream and reserved bacon pieces, stir well.
  • Allow soup to cook for 15 for minutes before serving.
  • Top with additional sour cream, bacon, cheddar cheese, or chives. Enjoy!

Friday, July 11, 2025

Sweetie Pole Tomato

 Days to Maturity: 65 days from transplanting

Family: Solanaceae

Type: Indeterminate, Low Acid, Cherry Tomato

Native: Andes

Hardiness: Frost-sensitive annual

Exposure: Full sun

Plant Dimensions: Vines up to 6' or longer

Variety Info: ¾"–1" round, red tomatoes in large grape-like clusters.

Attributes: Frost Sensitive

When to Sow Outside: For mild climates only: 1 to 2 weeks after your average last frost date, and when soil temperature is at least 60°F.

When to Start Inside: RECOMMENDED. 4 to 6 weeks before transplanting. Transplant when air temperature is 45°F or warmer, usually 1 to 2 weeks after your average last frost date. Ideal soil temperature for germination is 70°–90°F.

Days to Emerge: 5–10 days

Seed Depth: ⅛"

Seed Spacing: A group of 3 seeds every 24"–36"

Row Spacing: 36"

Thinning: When 2" tall, thin to 1 every 24"–36"

Harvesting: Sweetie' tomatoes are at the peak of sun-ripened deliciousness when red, and have a slight give when gently squeezed.


Tuesday, January 14, 2025

Seed Saving

 Seed Saving Growing your own garden provides a wonderful opportunity to save the seeds your plants may produce. You can replant them next year or gift them to a friend. 

Supplies: 

Heirloom or heritage seeds 

Directions: 

1. Separate or collect seeds from your heirloom plants. For tomatoes, using a ne-mesh sieve, remove as much pulp as possible from seeds. Drain well. 

2. Paperclip a piece of parchment paper to a mesh tray and spread seeds out. 

3. Dry at 95℉ for 3-12 hours. 

4. Test for doneness. Larger seeds will need more drying time. It’s okay to over dry them to be sure all moisture is removed. Seeds should be rm and very dry. 

5. Store in an airtight container until it’s time to plant them again. 

Note: 

Hybrid plants do not produce seeds that will reproduce the same flowers or fruit. Only heritage or heirloom seeds are able to be saved and replanted.

Dehydrated Apples 🍎 🍏


Apples 

Ingredients: 

Apples 

Spices, if desired 

Directions: 

1. Wash apples 🍎. Peel, if desired, and remove the core. 

2. Cut into slices or rings. Aim for about ¼” thick. 

3. Pretreat with lemon bath (1/4 lemon 🍋 juice then 3/4 water) to prevent browning. Drain well. 

4. Toss in any spices you may be using. 

5. Place on trays. 

6. Dry at 130℉ for 4-6 hours. 

7. Test for doneness, listening for a crisp crack when broken in half. 

8. Condition, then store in an airtight container with an oxygen absorber if in humid environment.


Strawberry 🍓 Fruit Leather


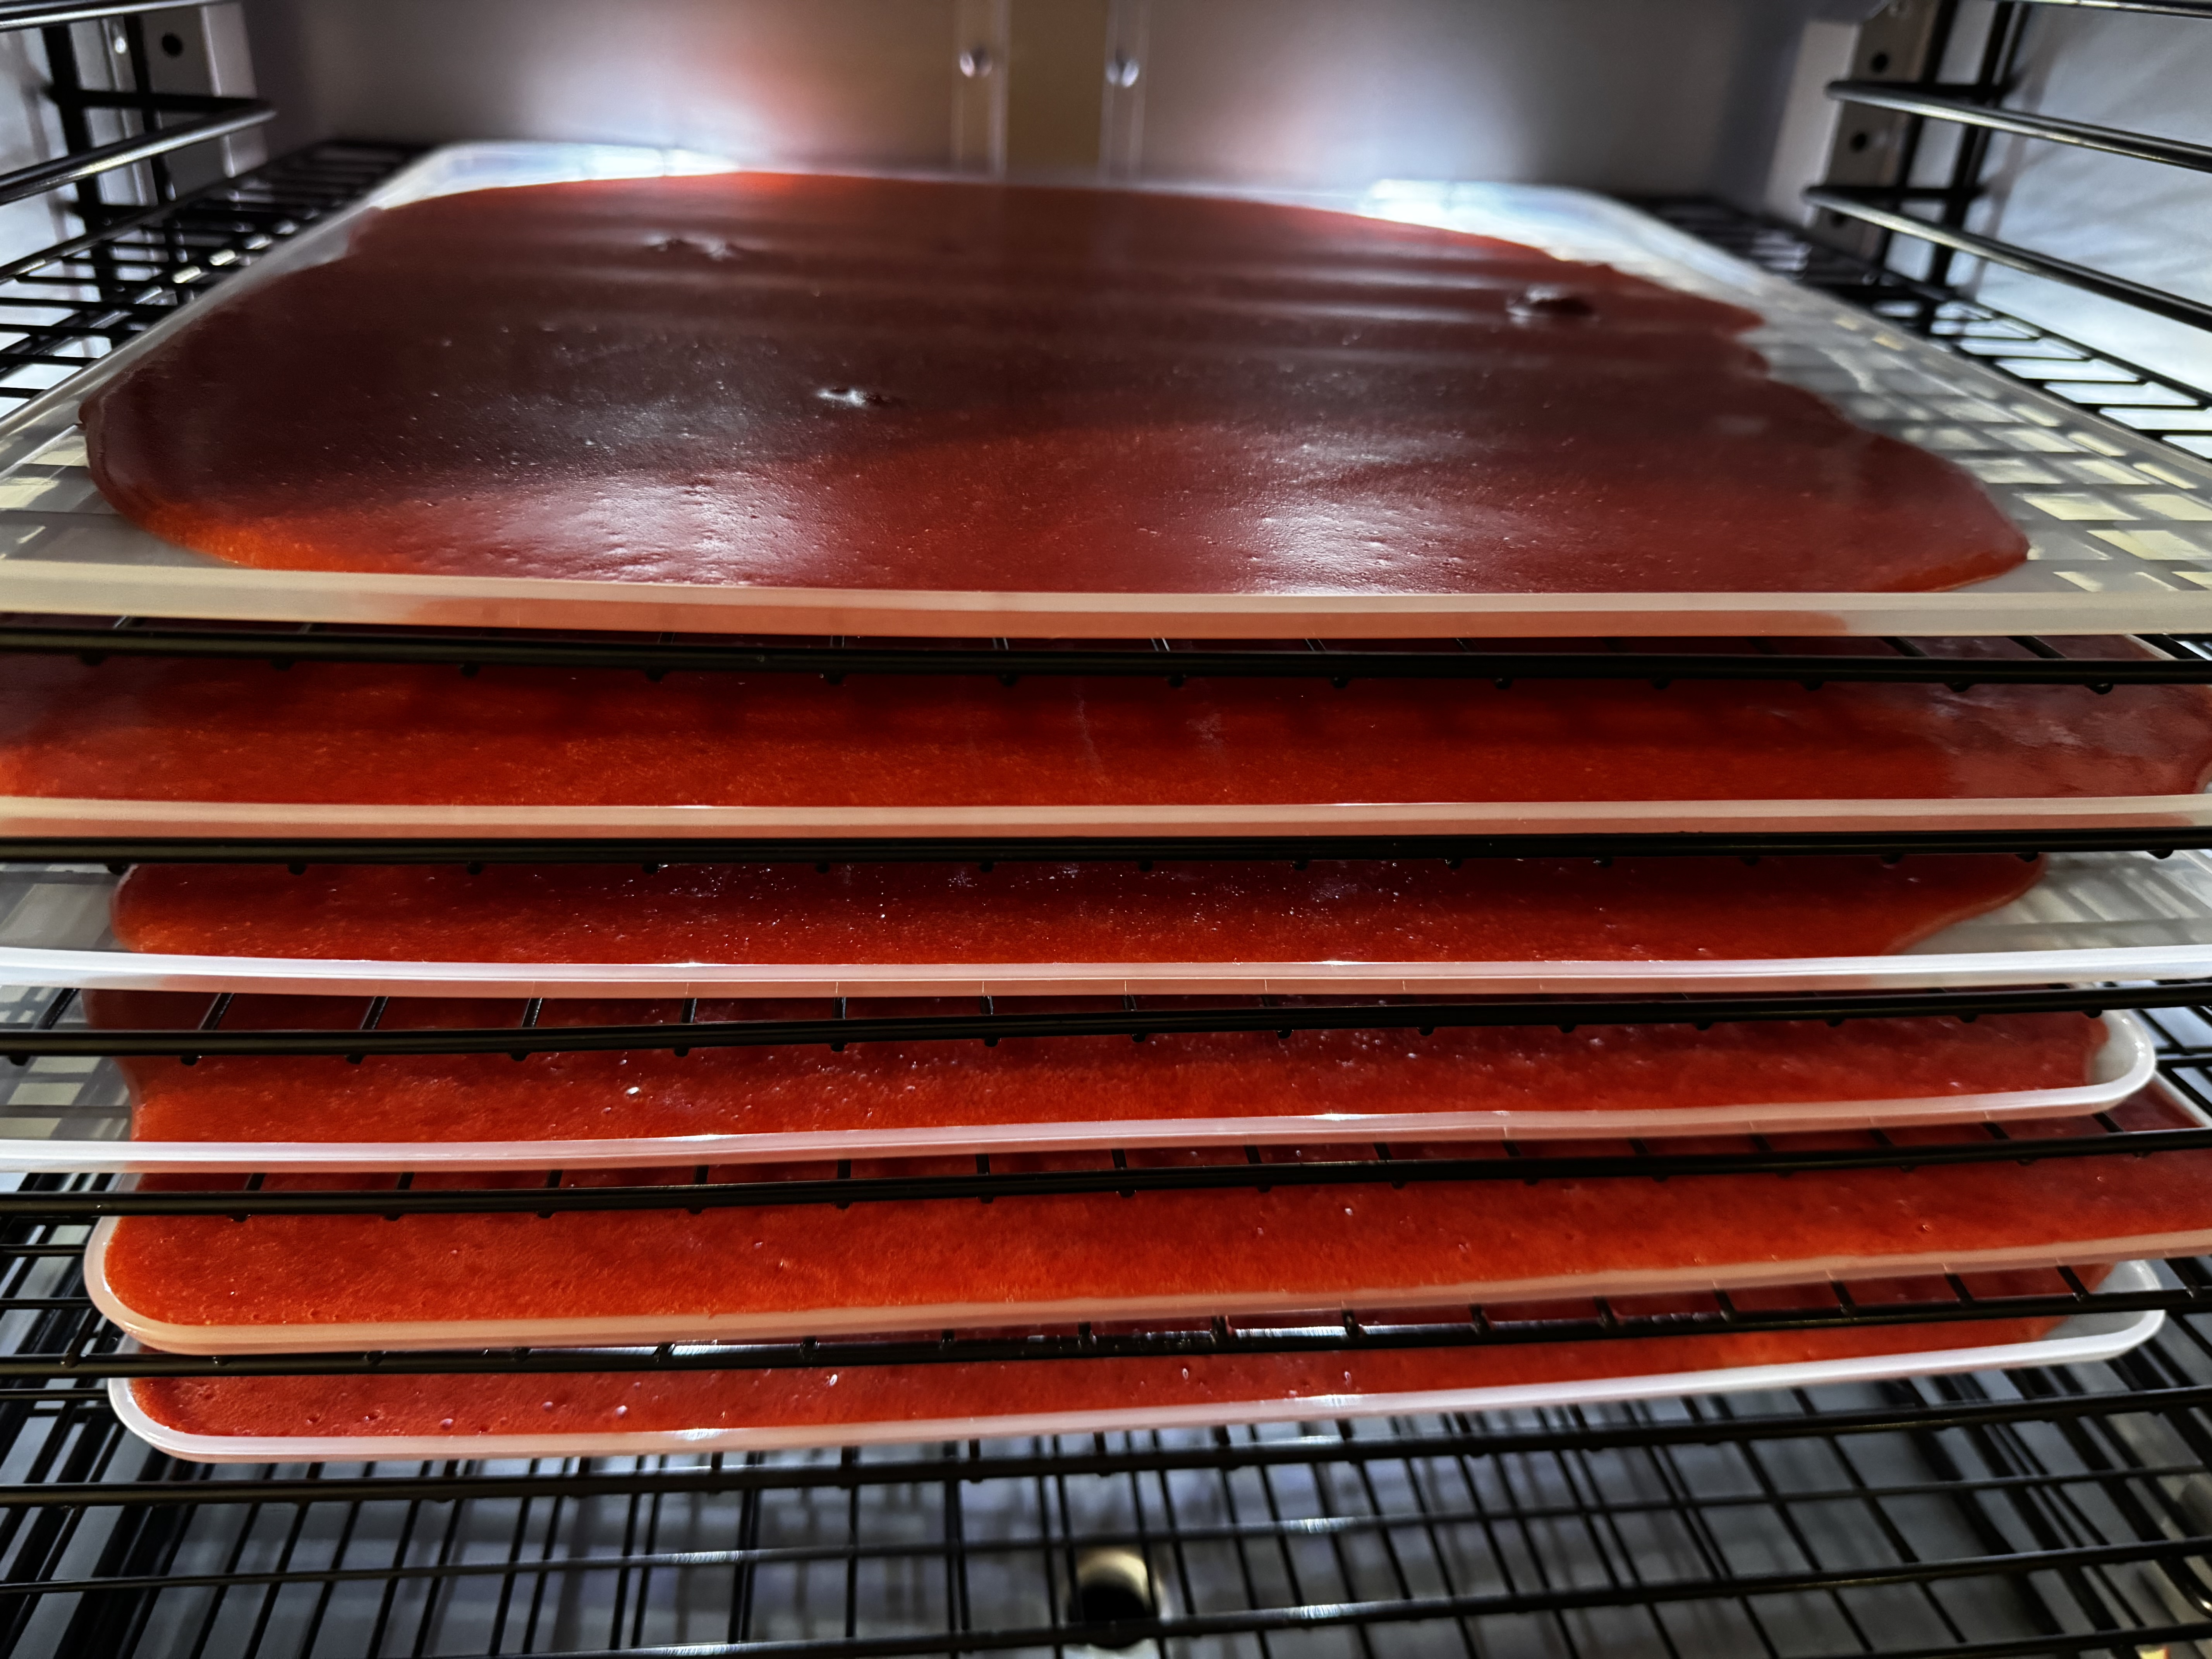
A no sugar added, thick (yet soft and pliable) fruit leather recipe with the addition of a secret ingredient that also has added health benefits! 

Equipment: 

High Powered Blender 

Food Processor Silicone Dehydrator Sheets Parchment Paper (optional) 

Ingredients: 

3.5 lbs strawberries 🍓 washed and hulled 

4 tsp Pomona's Pectin 4 tsp calcium water (comes with Pomona's Pectin) 

2 cups white grape juice concentrate (because this is hard to find these days, I used white grape juice and then boiled it down to 2 cups)

Directions: 

1. Prepare dehydrator trays with silicone mats or parchment paper. 

2. Wash, hull, then puree strawberries 🍓 in a blender. Measure out six cups of puree. 

3. Prepare calcium water according to package instructions, add four teaspoons of calcium water to the berry puree and mix well. 

4. Transfer the fruit mixture to a heavy-bottomed saucepan and bring to a simmer over medium heat. 

5. Meanwhile, in a clean blender, add 2 cups of white grape juice concentrate and turn on low speed. 

6. Slowly add the powdered pectin and mix well for about two minutes. 

7. Once the berry puree has been brought to a simmer, keep the heat on, add grape juice concentrate mixture, and stir for a full minute. 

8. Remove from heat and ladle mixture onto the dehydrator trays. 

9. Dehydrate at 115℉ for about 14 hours. Depending on the thickness, this will vary.

10.Test for doneness. Leather should be dry and edible, with no pockets of moisture. Always let the leather cool completely first. 

11. Cut cooled fruit leather into strips (or cute shapes using a cookie cutter), and roll up using parchment paper. 

12. Condition, then store in an airtight container with an oxygen absorber if desired


Sunday, January 12, 2025

Cilantro 🌿

 I love cilantro and use it maybe 1/3 of the time in my cooking. Seedlings emerge in 14-21 days. Use organic so you are not running into all those extra pesticides and such in your seed before it even begins. Seed them about 12 inches apart. Honestly I just throw a bunch in and let it go. I know that is not what you are supposed to do, but it works for me. 


I am sowing them in my greenhouse and going to keep them in there until Spring.

Cilantro needs 6+ hours of sun 🌞. Sow them to 1/4 inch deep 


Saturday, March 9, 2024

Lemon meringue pie


Ingredients

Pie Crust
2 1/2 cups of all purpose flour
1 tbsp granulated sugar
3/4 tsp of salt
10 tbsp of unsalted butter (pea sized and chilled)
4 to 6 tbsp if ice water

Filling
6 large egg yolks(use the whites in the meringue)
1 1/3 cups of water
1 cup of sugar
1/3 cup of cornstarch
pinch of salt
1/2 cup of fresh lemon juice
1 tbsp lemon zest
2 tbsp of unsalted butter

Meringue
6 large egg whites
1/2 tsp cream of tartar
1/2 granulated sugar
1/8 tsp of salt

Instructions

Pie Crust
 In a deep medium size mixed bowl, combine the flour, sugar, salt. Cut the butter into pea size pieces then add to the flower mixture. Working quickly use your hands to mix the mixture together. So as not to warm the butter. 
Drizzle a few tablespoons of water on the mixture and toss to moisten. Continue adding the remaining water until the dose sticks together and stay stuck when pressed between two fingers. It's OK if the dough is still crumbly and messy.
Turn the mixture out onto a clean surface. Use your hands to press the dough together. Gently fold the dough over and onto itself, repeating this three times until it's come together and a cohesive mass. Rap dough in about a 4 inch wide disc shape with plastic wrap. Refrigerate at least 30 min. I do it overnight.
To roll out the dough let the dough set at room temperature for 5 to 10 minutes or until it's slightly pliable. Roll the dough out on a flat work service between 2 baking paper sheets. I roll to 1/8 of an inch. 
Gently roll up and around the rolling pin, then unroll and drape over a 9 inch pie plate. Gently pressed into the pie plate, being careful to avoid stretching it to fit. Use scissors or knife or your fingers to trim the excess doe, leaving a 1 inch overhang if you choose. Fold the overhang under itself and crimp or flute, pierce the base of the dough with a fork.
Blind bake the pie shell in the oven at 400°F. Bake for 15 minutes or until just beginning to brown and no longer raw.

Filling
While the pastry case is cooling. Set oven temperature to 300°F
Whisk the egg yolks together in a medium bowl or liquid measuring cup. Set aside. Whisk the water, granulated sugar, cornstarch, salt, lemon juice, and lemon zest together in a medium sauce pan over medium heat. The mixture will be thin and cloudy, then eventually begin thickening and bubbling after about six minutes. Once thickened, give it a whisk and reduce heat to low.
Add the egg yolks in a very slow stream, a few large spoonfuls of warm lemon mixture into the egg yolks while stirring. Then also in a very low stream with the egg yolk mixture into the sauce pan. Turn heat back up to medium. Cook until the mixture is thick and big bubbles begin bursting at the surface. Remove the pan from heat and whisk in the butter. Spread filling into the warm, partially baked crust. Set aside as you prepare the meringue. Work on the meringue as soon as you fill the pie with the filling that way, it is still warm and adheres to the filling preventing separation. Cool in fridge.

Meringue
To make the meringue. Set oven to 300°F. 
Use a handheld mixer or a stand mixer fitted with a whisk attachment. Beat the egg whites and cream of tartar together on medium speed for one minute, then increase to high speed until soft peaks form, about four minutes. Add the sugar and salt, then continue beating on high speed until glossy stiff peaks form, about two more minutes. Spread meringue on top of filling. Make sure you spread the meringue all the way to the edges so that it touches the crust this helps prevent the meringue from weeping.
Bake pie on the lowest oven rack for 15 minutes. If the meringue is burning too quickly tend a piece of foil over as best you can without the foil touching the meringue. When pie is done removed from oven place on a wire rack and allow to cool at room temperature for one hour before placing in the refrigerator to chill. Chill for four hours before slicing and serving.


Storing the Pie
Cover any leftovers and store in the refrigerator. Lemon meringue pie taste best on day one because it doesn't keep very well. No matter how hard you try to prevent it the meringue will wilt and separate overtime. Best to enjoy it right away.


Sunday, November 14, 2021

Taco 🌮 Salad 🥗

The Ultimate Versatile Taco Salad

A quick, customizable family favorite that balances fresh greens with savory beef and a sweet-tangy finish.

  • Prep time: 15 minutes

  • Cook time: 10 minutes

  • Servings: 4–6

Ingredients

The Core Base

  • 1 lb Ground Beef (browned and drained)

  • 1 head Iceberg or Romaine Lettuce (chopped)

  • 1 bottle Catalina Dressing (the signature "end" to the salad)

The Mix-ins (Choose your favorite combo)

  • Vegetables: Diced tomatoes, corn (canned or fresh), diced onions.

  • Crunch: Fritos or Doritos (crushed slightly).

  • Extras: Salsa (mild or medium), shredded cheddar cheese.

Instructions

  1. Prepare the Protein: In a large skillet over medium-high heat, brown the ground beef until no longer pink. Drain the excess grease. For extra flavor, season with a pinch of salt, pepper, or taco seasoning.

  2. Prep the Greens: Wash and chop the lettuce into bite-sized pieces. Place them in a large serving bowl or individual bowls as the foundation.

  3. Layer the Toppings: Add your chosen combination of tomatoes, corn, salsa, and cheese over the lettuce.

  4. Add the Crunch: Just before serving, add a generous handful of Fritos or Doritos to ensure they stay crunchy.

  5. Final Assembly: Top the salad with the warm ground beef.

  6. The Finisher: Drizzle the entire salad with Catalina dressing. Toss gently or serve as-is for a layered look.


Building the Bowl  Use whatever is in your pantry
This recipe is perfect for "kitchen sink" meal planning!

The Classic: Lettuce, tomatoes, salsa, corn, meat, and Catalina.


The Frito Crunch: Lettuce, Fritos, salsa, and meat.


The Zesty Nacho: Lettuce, salsa, Catalina, cheese, and meat with Doritos.

Saturday, November 13, 2021

Jerky Recipes


  • 1st recipe
  • One 3-pound eye of round roast, trimmed of fat and silver skin 
  • (I used venison)
  • 1 cup (packed) dark brown sugar
  • 1 cup soy sauce
  • 3 tablespoons Worcestershire sauce
  • 1 tablespoon smoked paprika
  • 1 teaspoon freshly ground black pepper
  • 1 teaspoon red pepper 🌶 flakes
  • 1 teaspoon onion powder
  • 1/2 teaspoon garlic 🧄  powder

2nd recipe
3 pound meat of choice
  • (I used venison)
2 cups of soy sauce
Tbsp of Worcestershire sauce
1/2 tsp of liquid smoke
1/2 tbsp of garlic powder
1/2 tbsp of onion powder
1/2 tbsp of black pepper

Directions
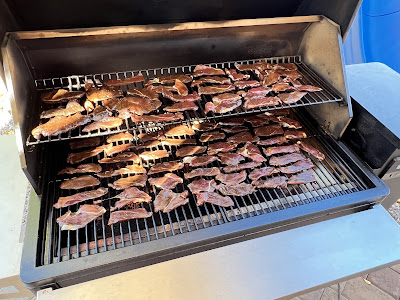
Put all the ingredients together to make the marinade. Then coat all the meat evenly. Put in the refrigerator and let it marinate for 12 - 24 hrs. I slice my mea at 1/8 in -1/4 in thick. Turn a couple times during that period. Once done either put in the oven for 3-4 hrs at 170° to 200°. I try to do the lowest my oven can go because we are not baking, we are dehydrating. You can use your smoker like we did most of it on and get that amazing smoke taste 👅. We did the smoker at 170 for 4 hrs.

Keep on counter for up to a week or put in fridge to prolong further. 


Spaghetti Sauce

I can’t believe I have not put this up until now. 

So without further ado, here is my recipe for spaghetti. I make it vegetarian for my canning, then I add meat when I am ready for dinner. I do this because when I canned this the first time with the meat, it seamed to dry out the meat. So now I add that after. 

Ingredients

1 cup Celery 
1 cup Carrots 🥕 
1 Onion 🧅 
1 cup Corn 🌽 
4 cups of tomato 🍅 (sauce)
1 Garlic 🧄 (to taste) I use a whole head 
1 tbsp of rosemary 
1 tbsp of Italian seasoning 
1 pound of Ground Meat 🥩 

Add it all to the pot if you are going to eat it and not cann it. Cook until you can put a fork in the carrot. If you are going to cann it, do not add the meat. 

For canning, process in pressure canner. 

Clean pint jars, lids and rings in hot soapy water.  

Prepare your preserve. 

Fill jars with 1 inch head space, place lids and rings properly. Place in canner. 

Vent canner properly. Pressurize. Process for 55 min (adjust for your elevation). 

Cool canner. down to 0 psi or until the canner looses all pressure. 

When done. Take out and put on a rack. Let it sit until cooled. (About 12 hrs) When cooled, check to see if it has sealed properly. Look here to see how, and all other important info on canning. 


Wednesday, October 27, 2021

Steak Enchiladas

 I make 2 at a time so I have nice leftovers. I make one with flour and one with corn. It makes everyone happy. 

INGREDIENTS

Corn tortillas or Flour tortillas

4 boneless, skinless chicken  🐓 breasts or 3 steaks 🥩 
1 tsp of cumin
1 tsp of chili powder
1/8 cup of vegetable oil
3 large onions 🧅 
2 cans(15 oz each) green enchilada sauce or red
4 cups fresh graded cheddar/jack cheese 🧀 , more if needed
Sour cream for serving
Diced tomato 🍅 for serving
Chopped cilantro 🌿 for serving


DIRECTIONS

Get all your ingredients together.

Preheat oven to 350° 


Cut up your steak and mix with your chili powder and cumin. Coat all of it.


Cook until done. About 2-3 minutes each side. If doing chicken do the same but make sure the juices run clear. Then shred your chicken.


Slice Onion like so.


Caramelize your onions 🧅 


Put your green enchilada sauce in the bottom of the pan. It will help things not stick. Wrap up your ingredients into your flour or corn tortillas and place them in the pan. Put more sauce on top and then cheese. 


Put in oven at 350° for 30 min. 45 if you put it in the fridge for a day.


Serve with your choice of toppings. 


;